
What Is Encapsulated Nail Art? Techniques and Styles
- Bradenton Salon Today
- 1 day ago
- 8 min read

Encapsulated nail art is defined as a professional technique where decorative elements like dried flowers, glitter, gemstones, or foil are permanently embedded between clear layers of acrylic or gel product. The result is a smooth, glass-like surface with a 3D floating effect that surface-level painting simply cannot replicate. This technique sits at the intersection of art and structural nail science, and it has become one of the most requested nail art styles heading into 2026. If you have ever wondered what is encapsulated nail art and whether it is right for you, this guide covers the full picture: technique, trending designs, durability, and safe removal.
What is encapsulated nail art and how does it work?
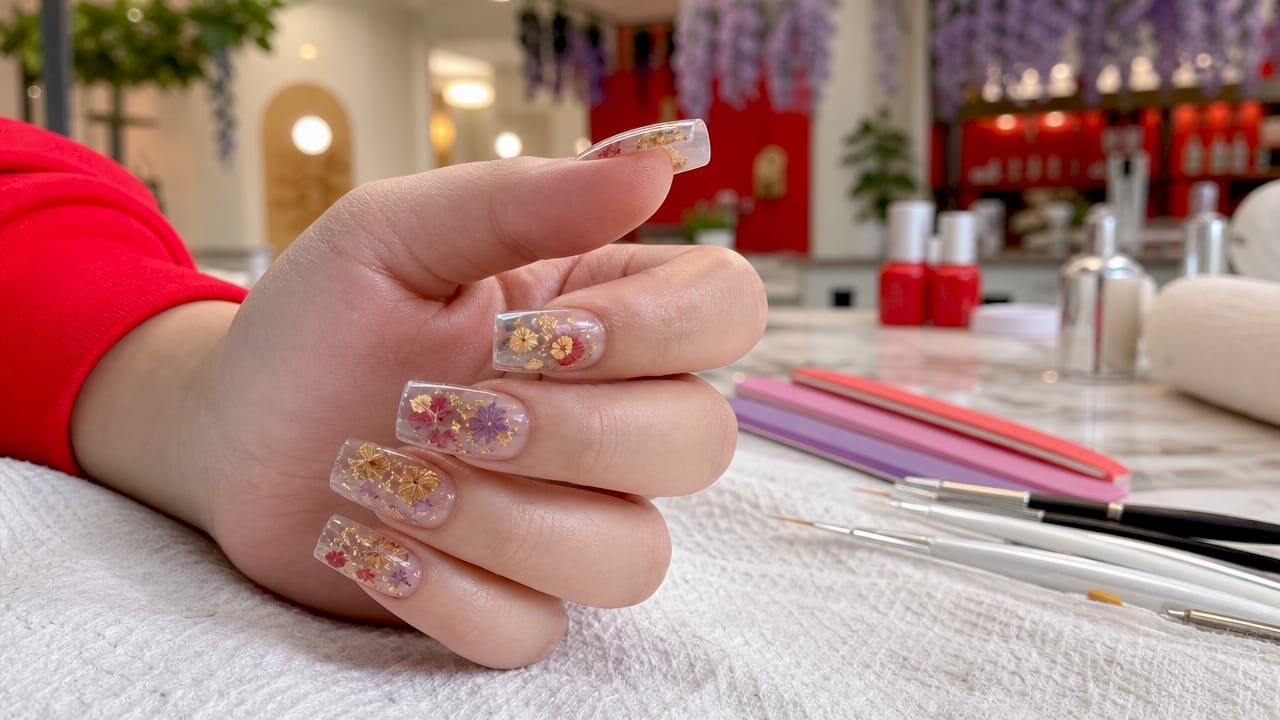
Encapsulated nail art is a sandwich technique where decorative items are placed on a wet or tacky base layer, then sealed permanently under a clear structural layer of acrylic or gel. The sealed layer locks the design in place, creating depth and dimension that looks three-dimensional from every angle. Unlike stamping or hand-painted nail art, the decorative elements never sit on top of the nail. They live inside it, fully protected from chipping, smudging, or fading.
The industry term for this process is nail encapsulation. The phrase “encapsulated nail art” describes the same method and is widely used by clients and technicians alike. Both terms refer to the same structural approach: embedding objects inside a clear nail product rather than applying them to the surface.
What makes encapsulation stand out is the visual effect it produces. The clear product acts like glass, giving embedded items a luminous, magnified quality. Glitter, dried flowers, and gemstones all appear to float inside the nail, which is why this style anchors the 2026 Glass Skin manicure trend. That trend prioritizes transparency and light refraction over opaque color, and encapsulation delivers both.
How is encapsulated nail art created?
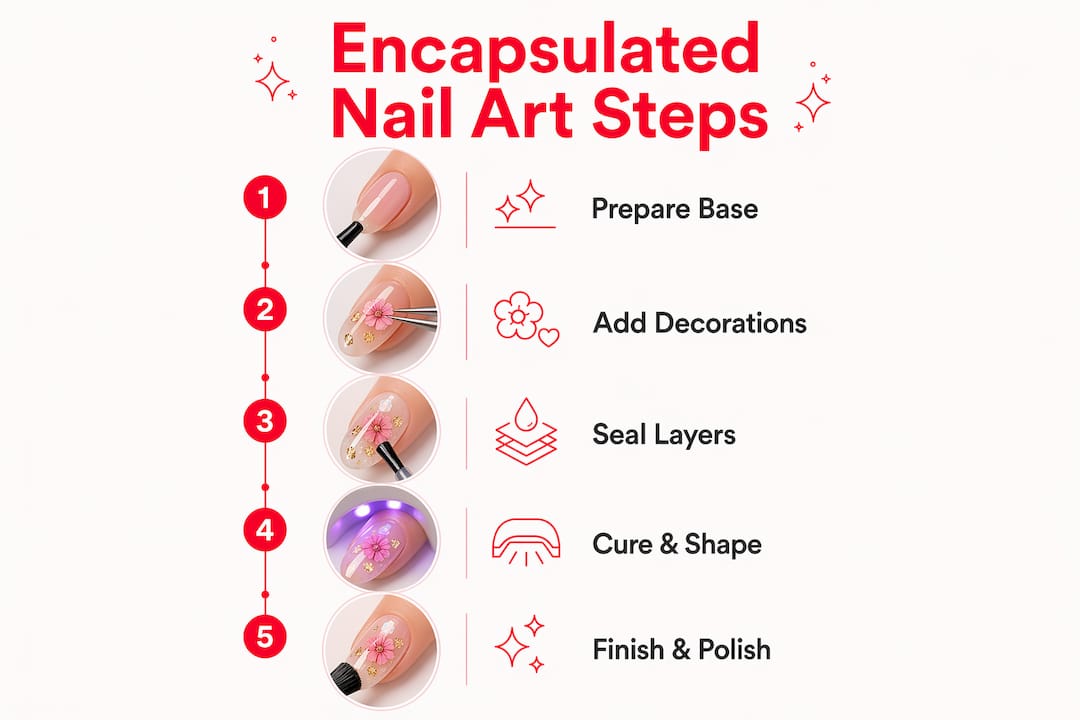
The creation process follows a precise sequence. Skipping or rushing any step produces lumpy, uneven nails that lift prematurely. Here is how a professional technician approaches the process:
Nail preparation. The natural nail is cleaned, buffed, and dehydrated. Any oils or residue on the nail plate prevent proper adhesion, so this step is non-negotiable.
Base layer application. A thin layer of clear acrylic or gel is applied and left slightly tacky or wet. This is the foundation that holds the decorative items in place.
Placement of decorative elements. The technician places the chosen items, such as pressed flowers, glitter, or foil, directly onto the tacky base layer. Placement must stay away from the cuticle and sidewalls.
Capping with a clear structural layer. A second clear layer is applied over the decorative items to seal them completely. This layer must be smooth and even to avoid a bulky finish.
Curing. Gel encapsulation requires UV or LED lamp curing between layers. Acrylic encapsulation self-hardens through a chemical reaction between liquid monomer and powder polymer.
Filing and finishing. Once cured, the nail is shaped, buffed, and finished with a top coat for added gloss and protection.
Technician skill is critical at the capping stage. Applying the clear layer too thick creates a bulky, unnatural look. Applying it too thin risks exposing the embedded items at the edges, which causes lifting. Balancing the thickness is what separates a flawless encapsulation from a mediocre one.
Pro Tip: Ask your technician to keep each decorative item fully submerged within the product layers. Items that touch the cuticle edge or sidewall will snag and lift within days, cutting your wear time significantly.
Clients should also expect longer appointment times than a standard manicure. The multi-step layering process requires patience and precision, and rushing it compromises the result. Budget at least 90 minutes for a full set.
Popular encapsulated nail designs and materials in 2026
The range of materials used in nail encapsulation is wide. Almost any flat or semi-flat item that fits within a nail-sized space can be encapsulated, provided it is dry and non-reactive with the nail product.
Common encapsulation materials:
Dried and pressed flowers (roses, lavender, baby’s breath)
Glitter in fine, chunky, or holographic cuts
Gold and silver foil sheets
Chrome powder applied before capping
Tiny gemstones and rhinestones
Pressed leaves and botanical fragments
Iridescent film and cellophane pieces
Each material produces a different visual effect. Fine glitter creates an all-over shimmer. Chunky foil produces a crinkled metallic look. Dried flowers give a romantic, organic depth that no painted design can match.
Design style | Primary material | Visual effect |
Botanical Window | Dried flowers, gold leaf | Pressed flower depth with luxury clarity |
Glass Glitter | Fine holographic glitter | Full-nail shimmer with light refraction |
Chrome Encapsulation | Chrome powder, clear gel | Mirror-like metallic finish with depth |
Foil Marble | Crinkled foil sheets | Abstract marble texture in gold or silver |
Gemstone Cluster | Rhinestones, tiny gems | Jeweled, dimensional sparkle |
The Botanical Window style, which embeds dried flowers and gold leaf inside clear gel, is the defining look of 2026. It gives a pressed flower effect with genuine depth and a luxury finish that photographs exceptionally well. Chrome encapsulation is the top choice for clients who want a statement nail without floral elements.
Design choice also depends on nail shape. Almond and coffin shapes give more surface area for botanical arrangements. Oval and round nails suit single-element designs like a centered flower or a gemstone cluster. Square nails carry geometric foil patterns particularly well.
How long do encapsulated nails last?
Encapsulated nails typically last 2 to 4 weeks when applied by a skilled technician using quality products. That range matches standard gel or acrylic manicure longevity. The sealed structure actually protects the embedded items from wear, so the design itself rarely degrades before the product does.
Several factors determine where your nails land within that 2 to 4 week window:
Seal quality. A complete, even cap layer is the single biggest factor. Any gap or thin spot in the clear layer allows moisture to enter, causing lifting.
Item placement. Items that touch the cuticle or sidewall create weak points that snag and peel. Proper placement keeps all elements at least 1 millimeter from every edge.
Nail health. Thin, brittle, or oily natural nails reduce adhesion. A nail strengthener applied before the base layer can help.
Daily activities. Frequent hand washing, exposure to cleaning chemicals, and physical labor all accelerate wear. Wearing gloves during cleaning extends the life of any nail enhancement.
Aftercare habits. Applying cuticle oil daily keeps the skin around the nail flexible, which reduces stress on the product edge.
Pro Tip: Avoid picking at or peeling any lifted edge. Lifting exposes the natural nail to moisture and bacteria. Book a fill or repair appointment instead.
How are encapsulated nails removed safely?
Standard soak-off removal does not work for encapsulated nails. Regular gel polish dissolves in acetone because it remains a relatively thin, flexible film. Encapsulated nails use a hardened structural layer that acetone alone cannot break down in a reasonable time frame.
Professional removal requires an electric file (called an e-file) or careful hand filing combined with clipping. The technician files down the bulk of the product, working in stages to avoid generating heat on the natural nail. Once the product is thin enough, the remaining layer is gently lifted or soaked off without force. This process protects the natural nail plate from tearing or thinning.
Improper removal is the leading cause of nail damage after encapsulation. Clients who try to peel or force off the product at home risk removing layers of their natural nail along with the enhancement. The result is thin, sensitive nails that take months to recover. Scheduling a professional removal appointment is the only safe option.
Pro Tip: Book your removal appointment before your nails start lifting significantly. Lifted product traps moisture and bacteria underneath, which can lead to nail infections. Two to three weeks is the ideal window for scheduling removal or a fill.
For clients familiar with gel removal, the process shares some similarities. A detailed guide on safe gel nail removal covers the foundational steps that also apply to encapsulated nail care.
Key takeaways
Encapsulated nail art is a multi-layer professional technique that embeds decorative elements inside clear acrylic or gel, producing a durable, glass-like design that lasts 2 to 4 weeks with proper application and aftercare.
Point | Details |
Core technique | Decorative items are sealed between a tacky base and a clear structural cap layer. |
Durability range | Professionally applied encapsulated nails last 2 to 4 weeks with good aftercare. |
Placement matters | Items must stay away from cuticles and sidewalls to prevent lifting and peeling. |
Removal requires a professional | Electric filing or hand filing is necessary; soak-off acetone alone is not sufficient. |
Trending designs in 2026 | Botanical Window and Chrome Encapsulation lead the Glass Skin manicure trend. |
Why encapsulation is the most technically honest nail art style
I have watched nail art trends cycle through countless styles over the years, and encapsulation is the one that consistently separates skilled technicians from average ones. You cannot fake it. Surface nail art forgives a shaky hand or an uneven coat. Encapsulation does not. The moment you cap that clear layer, every placement decision is permanent and visible.
What I find genuinely interesting about this technique is how it redefines the polished look through transparency rather than color. Most nail trends chase opacity, bold pigments, and heavy finishes. Encapsulation goes the opposite direction. It asks the nail to be a window, not a canvas. That is a fundamentally different design philosophy, and it produces results that feel more like wearable art than a standard manicure.
The floating effect of floral designs in particular creates something a painted flower never can: genuine depth. A painted rose sits flat on the nail. An encapsulated rose appears to exist inside the nail, suspended in glass. That distinction matters to clients who want their nails to be a conversation piece, not just a color choice.
My honest advice is this: if you are curious about encapsulated nail art, do not attempt it at home with a kit. The technique demands precise liquid-to-powder ratios, controlled layer thickness, and steady hands. A technician who has mastered encapsulation is demonstrating a high-level skill set. The results they produce are worth the appointment time and the professional price point.
— MinhHieu
Professional encapsulated nail art at Bradentonnails
Bradentonnails brings the technical skill and artistic precision that encapsulated nail art demands. The team at TJ Nails in Bradenton, FL has experience with advanced nail art techniques, from botanical encapsulation to chrome and glitter designs, all executed with attention to nail health and clean application standards.

Whether you want a single statement nail or a full set of Botanical Window designs, Bradentonnails offers flexible appointment times, including Sundays, to fit your schedule. The salon serves clients across West Bradenton, Palmetto, and Ellenton. Book your encapsulated nail appointment online and arrive ready to wear something genuinely worth looking at.
FAQ
What is encapsulated nail art in simple terms?
Encapsulated nail art is a technique where decorative items like flowers, glitter, or gems are sealed inside clear acrylic or gel layers, creating a smooth, 3D glass-like effect on the nail.
How long does encapsulated nail art last?
Encapsulated nails last 2 to 4 weeks when applied professionally, matching the longevity of standard gel or acrylic manicures with proper aftercare.
Can encapsulated nails be removed at home?
No. Encapsulated nails require professional removal using an electric file or hand filing. Acetone soak-off methods are not effective, and forcing removal at home risks serious damage to the natural nail.
What materials can be encapsulated in nails?
Dried flowers, pressed leaves, glitter, foil, chrome powder, and small gemstones are all commonly used. Any flat, dry, non-reactive item that fits within the nail surface can be encapsulated.
Is encapsulated nail art the same as 3D nail art?
They are related but not identical. Encapsulated nail art creates a 3D effect by embedding items inside the nail product. Traditional 3D nail art builds raised shapes on top of the nail surface using acrylic or gel sculpting.
Recommended
Comments